photography 201 - understanding histograms part 2: adjusting levels
Last photo 201 lesson we discussed histograms - this lesson we'll discuss how to make levels adjustments to improve the overall brightness and tones of your photo.
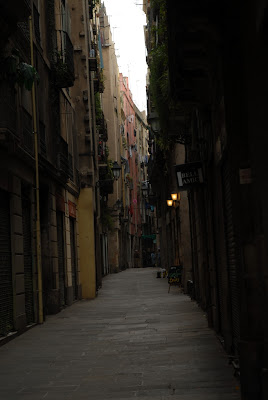
Here is my photo from Barcelona:
and here's the photo with the histogram pictured alongside of it:
As we discussed last "class" the histogram shows the luminance of the photo, and specifically that most of the pixels are concentrated on the left side, meaning the photo is pretty dark. By adjusting the tonal levels in this photo, however, we can significantly improve the overall look of the photos.
In Aperture, the levels editing tool allows you to edit luminance (light, mid, and dark tones) and RGB (red, green, and blue tones). The photo above shows the levels adjustment set to luminance - in my opinion this photo just needs to be brightened up a bit.
A quick note - levels adjustments are more precise than if you simply adjust the photo for overall brightness. Specifically, you can adjust the darker tones, mid tones, and light tones rather than just brightening or darkening the entire image.

In this photo, I adjusted the light tones only (starting from the right, moving the level towards the center), but notice that by moving the light level towards the center, the mid-tones level (in the center) also moved as well. The photo is brighter than the top image, but I think I can do more:

In this photo I further adjusted the mid-tones to make the image even brighter (which is really hard to see in the photo of Aperture, but look closely at the white lines in the level adjustment...) These changes are definitely subtle, but look at the yellow on the storefront and the foliage near the top - here you can see a noticeable difference in the brightness of the photo. The image is still on the darker side (it is a small windy road in Barcelona, mind you) but more visually interesting after making the levels adjustments.
And if that's not enough for you, you can also make adjustments to the highlights and shadows of the image. By adjusting the shadows, you are lightening the darker areas of the photos. Adjusting the highlights will darken the lighter areas of the photo. I know this is a little counterintuitive, but it makes sense after you practice with the adjustments.
Here's the final photo with some additional shadows adjustments:
By lightening the shadows, you can see more of the detail of the storefronts, the doorways, etc.
Here's a side by side comparison of all 4 photos (moving left to right) - notice the changes are subtle from photo to photo, but the difference between the unedited photo (far left) and the fully edited one (far right) is pretty dramatic.
I think the best way to learn about levels adjustment is to experiment with your own photos. In fact, when it came time to write this lesson, I had a hard time putting it to words, because I think the easiest way to figure out level adjustments it to just feel it out on your own.
Please post questions or email me.


0 comments:
Post a Comment