Showing posts with label exposure. Show all posts

Tuesday, August 11, 2009

photography 201 - exposure metering

I'm sort of embarrassed to admit I didn't know what the heck exposure metering was until recently. I thought I knew most of my camera's bells and whistles by now, but since I didn't read the owner's manual cover to cover, I guess there are some (ok many) things I missed. But I can't be the only one, right? So without further ado, let's talk exposure metering.

First off, let me clarify that I'm talking about in-camera exposure metering. I am not, however, talking about your various camera modes - this is photo 201, so we're taking it to the next level. Check your owner's manual to locate where your exposure metering control is located - on my Nikon D200 it's located near the viewfinder on the right hand side (the button that says "AE-L" and "AF-L"):

http://www.digitalreview.ca/cams/pics/NikonD200_back.jpg

Exposure metering determines how the image sensor will respond when a photo is taken. By understanding your options for exposure metering, you will get better exposure for your more challenging shots - shots with tricky lighting conditions. Generally speaking, there are 3 types of exposure modes: (1) center-weighted, (2) matrix or multi-segment mode, and (3) spot.

Center-weighted metering is just as it sounds - the metering focuses on the amount of light in the center of the frame, and sets the exposure accordingly. For example, if the center of your image is a white wedding dress, but the surrounding scene is dark foliage, center-weighted metering will exposure your shot based on the brightness of the white wedding dress. Center-weighted metering can be good for portraits, but many articles I read were not too fond of this metering setting. Take that for what's it's worth...

Matrix metering incorporates various calculations of the lighting throughout your image to achieve the proper exposure. Matrix metering is a more detailed approach to exposure than center-weighted metering. Most websites I perused for this post suggested you use matrix metering most of the time.

Spot metering is similar to center-weighted in that it focuses on the center of the image, but spot metering focuses on a very small portion of the overall image (which varies camera to camera). Spot metering is best for high contrast shots, like this one:

(photo courtesy of Planet Neil)

The lighting varies greatly in this image - spot metering will set the image sensor for the proper exposure of the men in the brightest part of the image.

Consider exposure metering an added boost to getting proper exposure in your photos. Any questions/comments - you know where to find me...

Thursday, June 25, 2009

what is aperture? (revisited)

So it's summer school around these parts - not a bad time to revisit some of the basic concepts we reviewed earlier this year (for those of you just starting with LF I started this blog as a one-year DIY photography lesson, so we covered the basics back in Jan/Feb).

I have come across some additional blog posts on the subject of aperture - posts that were amazingly clear on the subject and inspired me to essentially rewrite this lesson. So here goes...

I learned over at Pioneer Woman Photography that "photo" is the Greek word for light. So it follows that photography has everything to do with light, right? How much or how little light enters your camera determines what your photo will look like. Do any of your photos look washed out or too bright? Too much light entering your camera (overexposed photo). Any photos of yours too dark or almost black in parts? Too little light entering your camera (underexposed photo). How do you control the amount of light coming into your camera?

  1. aperture
  2. shutter speed
  3. ISO setting (i.e. film speed)
Aperture is the mechanism in your camera that determines how much light enters and hits the film or digital sensor. It can open large or small to let more or less light in, depending on your circumstances.

Here are some diagrams I saw over at Bacon Lettuce Photo:

You can see from the diagrams that if you want MORE light to come into the camera, you need to select a LOWER aperture or f-stop setting, such as f2.8. Conversely, if you want LESS light to come into the camera, you need to select a HIGHER aperture setting, such as f/16 or f/22.

Still with me? This concept is really important, so go back and read it again if it doesn't make sense. Seriously. Read it again.

So, now that you know more about camera modes, and you're feeling adventurous and want to try aperture priority mode, what setting should you select? Depends on what look you want. Aperture determines, to a large extent, the depth of field for your photo - the distance between the nearest and farthest objects in your photo that will be in focus.

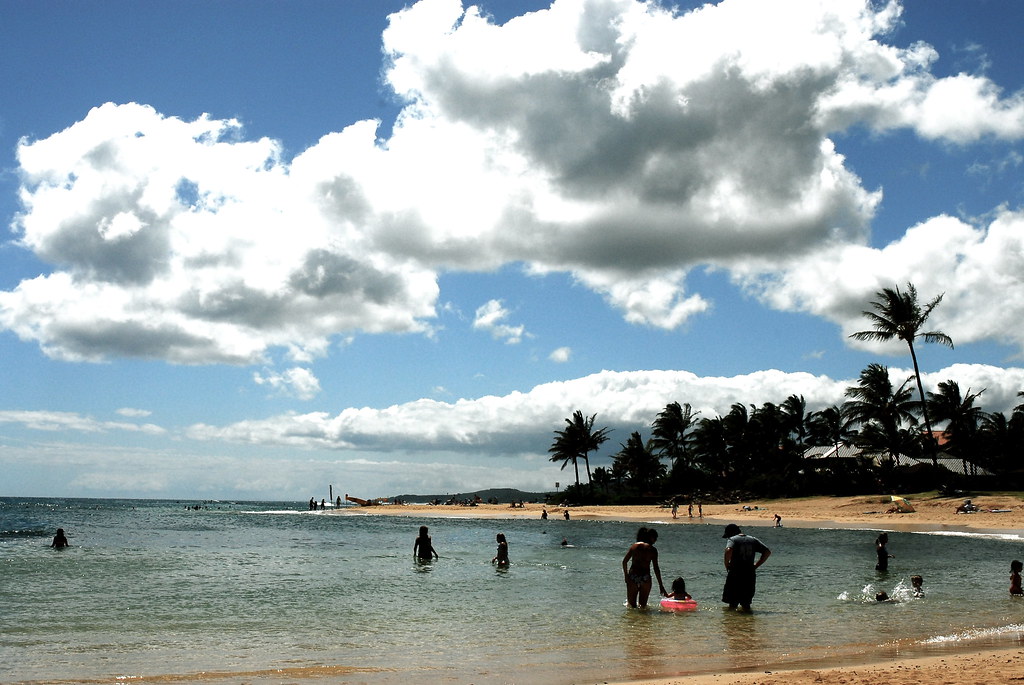
  • If you want most or all of your photo to be in focus (i.e. a beautiful landscape), select a HIGHER aperture setting.
Poipu Beach
(aperture = f/14)
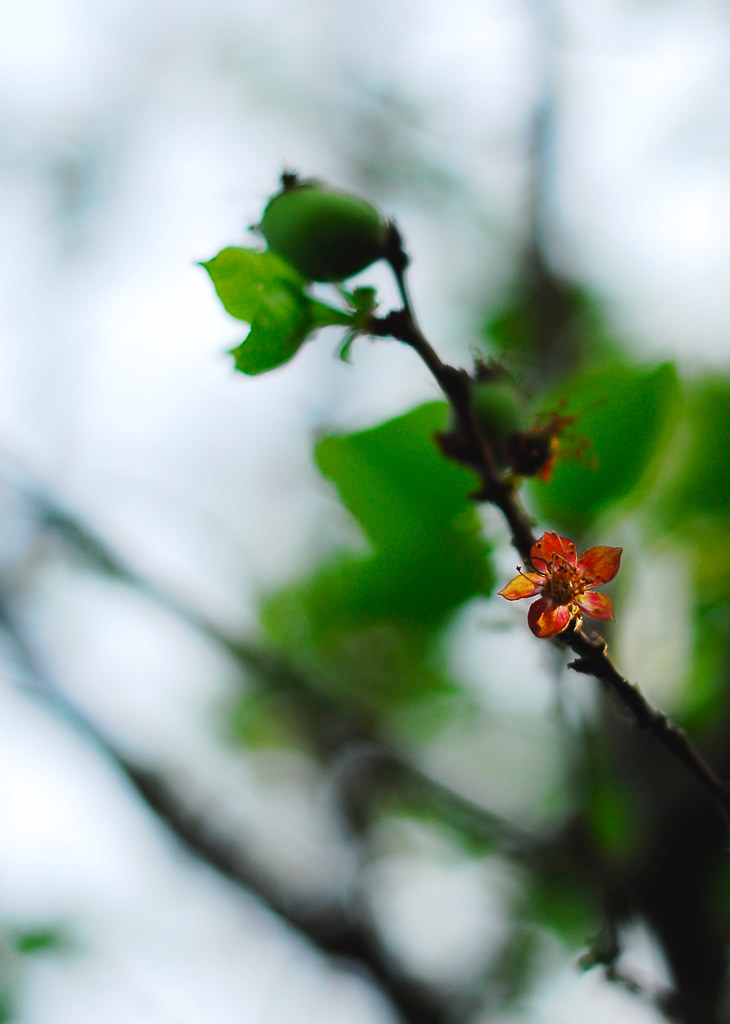
  • If you want a shallow depth of field, meaning you want your subject to be in focus but all of the background blurry, select a LOWER aperture setting.
spring bloom
(aperture = f/1.8)

Obviously there are other factors that will impact your photo's exposure - let's save those for the next few weeks. Until then, break out the camera, move that camera mode dial to aperture priority and start shooting!

Yo

Thursday, April 23, 2009

exposure triangle

During a break in the photo shoot for alice rose, her mom brought over her brand new Nikon D60 for some quick tips on how to use it. So I sat down for what I thought would be a straightforward tutorial, and a bunch of gibberish came out of my mouth. I tried to explain ISO, aperture and shutter speed to a new mom, no less, and I'm afraid I just confused her. Which then made me worry that maybe some of my lessons are too obtuse? Too abstract? Too much detail? (send me an email if you have an opinion on that) I figured now is a good time to review the basics of photography again. But first, an analogy:

Growing up, I took dance classes. Lots of them. I loved tap and jazz, and later when I went to college I dabbled in modern and African dance. But I never really warmed up to ballet - I thought it was slow and boring. Only after taking dance classes in college did I realize the importance of ballet to the art form of dance - the techniques you practice in ballet form the backbone for most other forms of dance. I wished many times I had taken ballet from the beginning, rather than trying to play catch up in my twenties.

Generally speaking, there are 3 main components to a good photo: exposure, composition, and focus. Think of ballet as the exposure component - you may have a great eye for composing interesting photos, and you understand how to focus your camera, but if you cannot get the correct exposure for your photograph then you're missing out on a truly great photo. Sure, you can use editing tools to correct your mistakes, but sometimes that leads to overly processed photos.

THE EXPOSURE TRIANGLE

The "exposure triangle" is comprised of: (1) aperture, (2) shutter speed, and (3) ISO. You can click here for a review of my lesson on aperture and shutter speed. In a nutshell, ISO is the sensitivity of your film, or in digital photography, your image sensor. The lower the ISO, the less sensitive your camera is to light. For a more detailed explanation click here (courtesy of Digital Photography School). These three concepts work together for the perfect exposure, hence the "triangle" concept. A change in any "angle" of the exposure triangle will necessitate a change in the other angles.

Digital Photography School has a good article on the exposure triangle - one metaphor used to explain it is a window with shutters: the aperture is the size of the window (lower f-stop = big window, higher f-stop = smaller window); the shutter is, conveniently enough, the window shutters. Shutter speed is the amount of time the shutters stay open before closing on the window. ISO is you sitting inside the room with sunglasses on (so you are desensitized to how much light is coming in - like a low ISO setting). There are many options to achieve the optimal light in the room - increase or decrease the size of the window (aperture), increase or decrease the amount of time the shutters are open (shutter speed), or take off your sunglasses (ISO).

These concepts may be basic and essential to good photography, but they are not easy to master by any means. Practice makes perfect. If any of you have a specific question about your camera settings and how to change aperture, shutter speed or ISO leave a comment or send me an email - I'd love to help.

Thursday, April 2, 2009

editing 101 - fixing exposure

It's your lucky week Lens Flare readers - 2 lessons in one week! I'm pretty excited about this series, because I believe for many of you understanding some basic editing skills will enhance your photographs tremendously. Let me be clear, though - editing is no substitute for mastering the basics and for composition. No amount of editing will transform an otherwise mediocre photo into an amazing one.

For this series I will be using Picnik - an online photo editing service, but the lessons are applicable to any photo editing program (photoshop, iphoto, etc.) Personally, I edit using iphoto and Aperture, but if any of you have editing programs that you like and would like to share with other readers, please leave a comment.

So here we have 2 photos of this amazing shrub in my front yard (anyone know what kind of shrub this is? It was indescript about a month ago and now - WOW). The first is underexposed and the second is overexposed. Never fear, some basic editing in Picnik and you can transform these photos to (almost) perfect exposure.

Underexposed

After uploading your photo, choose the "exposure" tab (in the edit section). To fix an underexposed image, move the lever to the right (positive numbers) until the photo looks properly exposed.

From this:

To This:


Overexposure:

Same as above, but move the lever towards the left (negative numbers)

From this:

To This:


See? Big difference - and this is only one of numerous edits you can do to enhance your photos!

I'll be back next week with more editing 101.