Showing posts with label editing 101. Show all posts

Thursday, September 17, 2009

RAW versus JPEG - you be the judge

I think I've made it perfectly clear over the last 9+ months of this blog that I'm not a "techie" kind of girl. I find the older I get the more technically challenged I become. It's because I made fun of my grandmother for blowing up an egg in the microwave one time, or teasing her because she was afraid of our VCR, I'm sure. Karma always gets the last laugh, people.

So when it comes to the more technical side of photography I have a tendency to shy away from anything that I find too complex. I realize that isn't logical, given that I am trying to learn MORE about photography, but it's true. Thankfully, this blog has given me a reason to push myself and my knowledge of photography, so I am learning to let go of my technical phobia.

First, a story for you. A few years ago I shot hundreds of vacation photos all in RAW format, without knowing anything about why one would shoot RAW format. Word on the street was RAW was WAY better than shooting JPEG. At the time, though, I didn't have software to process RAW formatted digital photos, so when I went to edit and print out my RAW photos, I either could not open the file, or once printed they looked terrible. That experience was enough to scare me away from shooting RAW - until now. This time I want to truly understand the difference between shooting RAW versus JPEG format, and you, my dear readers, are along for the ride.

Some of you might be thinking "what do you mean - I have a choice??" Why, yes you do - check out your owner's manual for your specific options - you might be surprised just how many options you have!

The most simple and straightforward explanation I've come across was posted over at The Lightroom Lab: picture RAW formatting as a roll of black and white film, and JPEG as a Polaroid image.

Photos shot in RAW format are the exact file the camera writes to the memory card. The camera's internal processor does not alter the original data in any way. However, this original data requires specific software to "process" the original data into files and images you can edit and print. So, if RAW format is a roll of black and white film, your editing software is the way you "develop" RAW images. Otherwise, you won't be able to view, edit, or print your RAW images.

JPEG format, on the other hand, tells the camera to convert the original data into a polished and universally acceptable file format. JPEG images can be viewed straight out of the camera, with no additional processing required - much like an image from a Polaroid camera.

So what are the benefits to shooting RAW versus JPEG, or vice versa? Depends on who you ask - and EVERYONE seems to have an opinion on it. Digital Photography School has a simple breakdown of the pros and cons of each format - click here to check it out. Any questions - leave me a comment or send an email on over!

Thursday, August 20, 2009

"vintage" flair - how I do it

As promised, here is lesson no. 2 for the week!

Ok, I admit - I'm not going to tell you EXACTLY how I do it. I have to keep a little mystery around my photography aesthetic - it'll keep you coming back. But this is first and foremost a place to learn more about photography - that's why I started this blog. So if you ask it, I will answer.

Mary was wondering how I achieved that vintage feel to these photo:

county fair

county fair

Let me state for the record that any "vintage" editing tricks I will espouse today I learned the old fashioned way - by trial and error. For any of you well versed in Photoshop there is an entire world out there of actions and tricks and edits to create shots that are as vintage as you would like.

These tips are for those of you looking for some creativity using very basic editing skills, so here goes:

1) Play around with the white balance, color temperature, and saturation. Click here to review my lesson on color temperature and saturation. Here is an example:

county fair

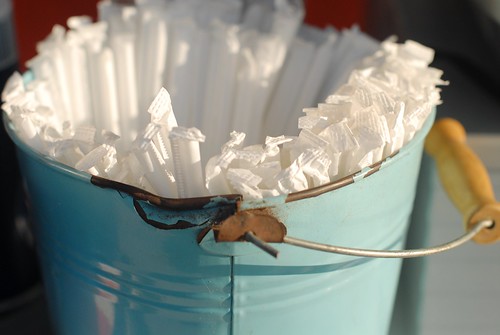
Here is the original photo - a pail full of straws at the county fair. I love the bright white against the aqua of the pail.

edited pail

Here is the "vintage" version, editing only the color temperature and saturation. Essentially, I bumped the color temperature WAY up and then dialed the saturation WAY down until I found that balance between the yellow-ness and the faded look of old photos.

This is the most basic way - here are a couple more options:

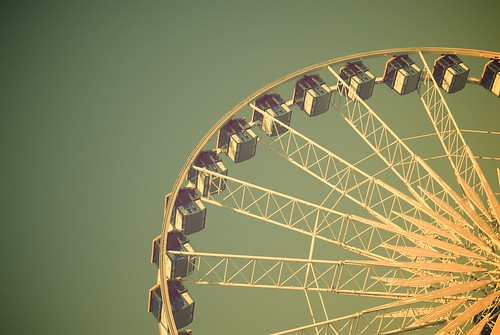
2) play with tint. iPhoto allows you to change the tint of an image, with a lever that moves from red to green. In Aperture there is a more advanced means of changing tint, allowing you to tint the photo to any color of the rainbow. I used this control in Aperture to change the tint of the ferris wheel photo above to have a more yellow tint.

3) check out this tutorial on how to make your digital photos look like lomo photography (click here for more info on lomography).

A few weeks ago I picked up a vintage 1960s film camera that I'm hoping to take for a spin soon. I'll be sure to post my "real" vintage images when I get a chance...


Thursday, April 16, 2009

editing 101 - cropping

Here is another trick to create a better background for your photos - cropping. Cropping is an easy way to fill the frame with your subject after you've taken the photo (and to eliminate any background you are not happy with...)

An example - take this photo of my niece Kensington:

I actually like this one as is, but if I wanted less of the background in the picture, I can simply choose to crop it (in Picnik or some other editing software - in Picnik go to edit and choose the "crop" button).

From the original photo I cropped it to be a portrait or vertical photo with less of the background showing:


For this one I cropped it so that her face was the focal point of the photo:


Cropping is so simple, but a very easy way to create a better photo.

Thursday, April 9, 2009

editing 101 - fixing color

I've been asked recently about how to improve color in a photograph, so today's lesson focuses on using digital editing tools to improve color via saturation and color temperature.

With respect to photography, saturation refers to the vibrancy or purity of color in your photos. In a nutshell, your photo is oversaturated if the colors are too intense, and undersaturated if the colors are dull. Color temperature in photography refers to the amount of "heat" or "light" the colors in your photograph give off - essentially the white balance setting on your camera.

Here's an example of a photo that is oversaturated and with a too "warm" color temperature.

Take this picture of my little one playing with (or attempting to eat?) my older daughter's "fuzzy baby." You can tell by looking at her skin tone and by looking at the white of her shirt that something is amiss in this photo. Never fear - Picnik is here!

In Picnik, under the edit button click on the colors tab - there you have the option of adjusting both saturation and color. Adjustment are intuitive - for an oversaturated image, move the lever to the left (like negative numbers), and for undersaturated or dull photos, move it to the right (positive numbers).

Here's an adjustment to saturation only:

And here is an adjustment to both saturation and temperature:

Voila! The purpose of adjusting saturation and temperature is to render the photograph to be as close (color-wise) to what you see with your own eyes. Play around with the adjustments to see how much more color-accurate your photographs can be, but also to see which photos are more pleasing to your eye. For example, even though the last image is the most accurate, I kind of like the tone and colors in the photo where I adjusted only saturation. You decide how much editing you need to get the colors that are best representative of the image. Remember, saturation and temperature adjustment can be made in any photo editing software you choose, not just Picnik.

Any questions? Leave a comment or email me.

Thursday, April 2, 2009

editing 101 - fixing exposure

It's your lucky week Lens Flare readers - 2 lessons in one week! I'm pretty excited about this series, because I believe for many of you understanding some basic editing skills will enhance your photographs tremendously. Let me be clear, though - editing is no substitute for mastering the basics and for composition. No amount of editing will transform an otherwise mediocre photo into an amazing one.

For this series I will be using Picnik - an online photo editing service, but the lessons are applicable to any photo editing program (photoshop, iphoto, etc.) Personally, I edit using iphoto and Aperture, but if any of you have editing programs that you like and would like to share with other readers, please leave a comment.

So here we have 2 photos of this amazing shrub in my front yard (anyone know what kind of shrub this is? It was indescript about a month ago and now - WOW). The first is underexposed and the second is overexposed. Never fear, some basic editing in Picnik and you can transform these photos to (almost) perfect exposure.

Underexposed

After uploading your photo, choose the "exposure" tab (in the edit section). To fix an underexposed image, move the lever to the right (positive numbers) until the photo looks properly exposed.

From this:

To This:


Overexposure:

Same as above, but move the lever towards the left (negative numbers)

From this:

To This:


See? Big difference - and this is only one of numerous edits you can do to enhance your photos!

I'll be back next week with more editing 101.